If you have arrived at this page directly, please go through this post, then this one and this first. It explains some basics, defining HTTP protocol configurations, headers, feeders and HTTP requests, defining scenario which we will use to design the load injection pattern.
Step 6: Load Injection
The definition of the injection profile of users is done with the inject method. This method takes as argument a sequence of injection steps that will be processed sequentially. A simulation can contain only one setUp [/code] method, the setUp method can have multiple inject profiles in it.
Example 1: Basic
setUp(
	ApiLoad(1, pPacing, pTestDuration).inject( //1
		nothingFor(10 seconds), //2
		rampUsers(pVusers) over(pRampUpTime seconds) //3
	))
	.protocols(httpProtocolConfig) //4
	.assertions(global.responseTime.max.lessThan(10000)) //5
	.maxDuration(pTestDuration seconds) //6
- Execute ApiLoad scenario defined in step 5 passing step=1, pacing=pPacing, and duration=pTestDuration as arguments. Scenario name will become “API Scenario 1” as the value of step is 1. See the second example to know why I used this.
- In this injection pattern, nothing is run for 10 seconds
- then pVusers are ramped up over pRampUpTime seconds. Once all pVusers are ramped up, users keep on injecting the load as defined in the scenario for duration seconds.
- Use protocol configs defined in step 1 in this post
- Assertions are used to verify global statistics like response time or the number of failed requests matches expectations for a whole simulation. All the assertions are evaluated after running the simulation. If at least one assertion fails, the simulation is reported as failed.
- maxDuration – use this only when you want to put a hard limit on simulation execution duration because this overrides the combined time of pRampUpTime, pPacing, pause, pTestDuration used in the scenario setup and inject method etc.
Example 2: Stepwise load pattern. This scenario is similar to above except, that the load is increased by pVusers at regular intervals of pStepTime for pNumSteps steps. i.e. staircase like load pattern – useful for stress or breakpoint test.
val pSteadyStateTime = pTestDuration - (pRampUpTime * pNumSteps)
val pStepTime = pSteadyStateTime/pNumSteps

val stepsParams = 1 to pNumSteps map { i => {
	ApiLoad(i, pPacing, ((pNumSteps - i + 1) * (pRampUpTime + pStepTime))).inject(
			nothingFor((i-1) * (pRampUpTime + pStepTime) seconds),
			rampUsers(pVusers) over (pRampUpTime seconds),
			nothingFor(pStepTime seconds)
		)
	}
}
println("\nLoad Pattern	:" + stepsParams + "\n")
setUp(stepsParams:_*)
	.protocols(httpProtocolConfigForApiLoadTypeOne)
	.maxDuration(pTestDuration seconds)
	.assertions(
		global.responseTime.max.lessThan(10000)
	)
Formatted output:
Load Pattern :Vector(
PopulationBuilder(ScenarioBuilder(API Scenario 1,List(io.gatling.core.action.builder.LoopBuilder@4a3329b9)),InjectionProfileWrappedArray(NothingForInjection(0 seconds), RampInjection(200,100 seconds), NothingForInjection(1100 seconds))),Protocols(Map()),List(),None),
PopulationBuilder(ScenarioBuilder(API Scenario 2,List(io.gatling.core.action.builder.LoopBuilder@12bfd80d)),InjectionProfile(WrappedArrayNothingForInjection(1200 seconds), RampInjection(200,100 seconds), NothingForInjection(1100 seconds))),Protocols(Map()),List(),None),
PopulationBuilder(ScenarioBuilder(API Scenario 3,List(io.gatling.core.action.builder.LoopBuilder@41925502)),InjectionProfile(WrappedArray(NothingForInjection(2400 seconds), RampInjection(200,100 seconds), NothingForInjection(1100 seconds))),Protocols(Map()),List(),None))
You see, three unique scenarios with names “API Scenario 1“, “API Scenario 2“, and “API Scenario 3“.
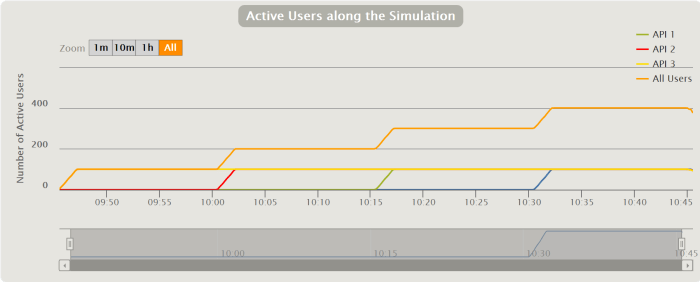
The staircase-like load pattern visualized
Example 3: Executing different scenarios in parallel with different protocol configs Useful when you want to run APIs along with browser application load.
setup(
	ApiLoadTypeOne(1,30,360).inject(atOnceUsers(1)).protocols(httpProtocolConfigForApiLoadTypeOne),
	BrowserLoad(1,5,360).inject(atOnceUsers(1)).protocols(browserAppHttpProtocolConfig),
	ApiLoadTypeTwo(1,5,360).inject(atOnceUsers(1)).protocols(httpProtocolConfigForAPiLoadTypeTwo)
)
.maxDuration((pTestDuration) seconds)
Example 4: This scenario setup ramps up the pVusers over pRampUpTime. Each a user logs in, performs the specified number of searchesPerUser with inter-search gap of pacing seconds before logging out. It also flushes the session cookies and http cache before logging in. This resemble simulating a typical vuser_init-> vuser_action-> vuser_end like Loadrunner scenario.
def BrowserLoad (step: Int, pacing: Int, searchesPerUser: Int) =
	scenario(s"BrowserLoad $step").group("Search"){
		exec(
			exec(flushSessionCookies)
			.exec(flushHttpCache)
			.exec(loginpage)
			.pause(2)
			.exec(login)
			.repeat(searchesPerUser){
				pace(pacing seconds)
					.exec(
						exitBlockOnFail{
							exec(OpenSearchPage)
							.exec(SubmitSearch)
							.pause(2)
							.exec(ViewSearchResults)
							.pause(2)
							.exec(ChooseOneEntry)
							.pause(2)
							.exec(OpenSearchEntry)
						}
					)
			}
			.exec(logout)
		)
	}
setUp(
	BrowserLoad(1, pPacing, pSearchesPerUser).inject(
		nothingFor(10 seconds),
		rampUsers(pVusers) over (pRampUpTime seconds)
	)
)
Next, we will look into how we can define before and after hooks, both are optional in a simulation. The before hook executes before a simulation starts. The after hook executes after a simulation ends. Hooks are useful when you want to resume or update a sequence counter where a previous test ended/started. For example, in the following before hook, we are setting few values in the simulation using a properties file.
before {
	//println("Before Starting Simulation")
	val props = new Properties()
	val file = new File("sequences.properties")
	if (file.exists()) {
		val inputStream = new FileInputStream("sequences.properties")
		props.load(inputStream)
		inputStream.close()
	}
	someSequenceNo.set(props.getProperty("someSequenceNo", "0").toLong)
	someCounterNo.set(props.getProperty("someCounterNo", "0").toLong)

	println("# someSequenceNo: " + someSequenceNo.get())
	println("# someCounterNo: " + someCounterNo.get())
	println("Starting simulation")
}
Done! We’ve gone through various ways of creating scenarios and simulations. Check this post to see completed simulation example.

You have got a style of writing and explaining things. Thankyou :)
LikeLiked by 1 person
Thank you :)
LikeLike
* Based on LoadRunner, a scenario (controller) contains a lot of scripts (vugen).
How can we translate this with gatling ?
– An only .scala file with lot of scenario function called by “setup()”
or
– Is that possible to make for every LR script a .scala file containing the Gatling scenario and 1 file with the imports and the setup() call ?
or
– Something else and for that i’ll need your light :)
For example i have 20 vugen scripts used in a single controller scenario to test my application. Can i use the same schema with a gatling project or not at all ?
* In order with the previous question is that possible to choose the number of VUser per Gatlign Scenario as we could do for a vugen script in a LR scenario ? You talk about pVUsers variable for the case of 1 scenario function. I think it’s not the same with multiple.
* Also can u give more details on how to initiate the pVariables you have in your code ?
Best regards
LikeLike
Hi Naiirod,
How can we translate this with Gatling? -> Both options specified by you can be used. A third option, which I use, is
– define all requests (e.g. APIs) and their feeders in separate scala files(s)
– define common headers in a separate a scala file
– Import both into another scala file in which you can define various scenarios and setup(s).
20 VUGEN scripts? -> use the above approach
Choose number of VUsesr per Gatling scenario? -> Yes you can do that. Refer this post https://theperformanceengineer.com/2016/12/01/gatling-simulation-from-scratch-load-injection-pattern/
You can add multiple scenarios in a single setup() method like this
setUp(
scenario1().inject(
nothingFor(0 seconds),
rampUsers(VUser1) over (pRampUpTime seconds),
nothingFor(duration seconds)
).protocols(apiHttpConfig),
scenario2().inject(
nothingFor(0 seconds),
rampUsers(VUser2) over (pRampUpTime seconds),
nothingFor(duration seconds)
).protocols(apiHttpConfig),
scenario3().inject(
nothingFor(0 seconds),
rampUsers(VUser3) over (pRampUpTime seconds),
nothingFor(duration seconds)
).protocols(webHttpConfig)
)
.maxDuration((pTestDuration) seconds)
Also, can u give more details on how to initiate the pVariables you have in your code ? -> This post is part of a series of posts. Please go through them and you will find answers to rest of your questions. :)
Thanks for stopping by :)
LikeLike
Great bloog you have here
LikeLike